Discover the ultimate guide on how to organize kitchen cupboards for maximum space. You will learn simple decluttering steps, smart storage solutions, and budget-friendly organizers that transform your kitchen. This cupboard makeover will make cooking easier and your home feel calmer.
A cluttered kitchen cupboard can make even the simplest meal feel stressful. If you open your cabinets and see stacks of mismatched plates and expired spices, it is time for a change. Learning how to organize kitchen cupboards is not about buying expensive organizers. It is about using the space you already have more wisely. With a few smart strategies, you can create a kitchen storage system that saves you time and reduces daily frustration. This guide walks you through every step, from decluttering to maintaining your new setup.
Many people avoid cupboard organization because they think it requires hours of work. That is not true. You can start small and build a pantry organization routine that fits your life. The goal is to make your kitchen work harder for you, not against you. When your cupboards are tidy, you cook faster, waste less food, and feel calmer every time you step into the room. Let us dive into the process.
Key Takeaways
- Start with decluttering: Remove everything from your cupboards and sort items into keep, donate, and toss piles before adding any organizers.
- Use vertical space wisely: Shelf risers and tiered trays instantly double your storage capacity without buying new cabinets.
- Group items by zone: Store daily dishes near the dishwasher and rarely used gadgets on high shelves to streamline your workflow.
- Add pull-out solutions: Lazy Susans and pull-out baskets eliminate dead zones and make every item easy to reach.
- Budget-friendly wins: Repurpose shoeboxes, mason jars, and tension rods for cheap cupboard organizers that look great.
- Maintain with small habits: A 10-minute reset after each meal and seasonal check-ups keep your kitchen tidy all year long.
📑 Table of Contents
Why Organizing Kitchen Cupboards Matters
Before you touch a single shelf, it helps to understand why this project matters. A messy cupboard wastes valuable space and hides items you need. You end up buying duplicates because you cannot find the olive oil or the measuring cups. Kitchen cabinet organization fixes these problems and brings order to your home. It also makes cleaning easier because dust does not hide behind stacks of boxes.
The Cost of Cluttered Cabinets
Clutter has a real cost. You spend money on things you already own but cannot find. You waste time searching through piles of pans. You may even let food expire because it sits lost in the back of a shelf. Maximize cupboard space by removing everything and seeing what you truly have. This simple act often reveals duplicate items and forgotten purchases. The first step in kitchen decluttering is awareness.
Quick Tip: Take a photo of your empty shelves before you put anything back. This visual reference helps you stick to a plan and avoid re-cluttering.
Common Mistake: Do not just shove items back in the same way. If you do not change your system, the clutter will return within weeks.
Expert Insight: Professional organizers often say that a cupboard should hold only items you use regularly or seasonally. If you have not used something in a year, consider donating it.
How to Organize Kitchen Cupboards: A Step-by-Step Blueprint
Now that you understand the why, let us look at the how. This step-by-step blueprint gives you a clear path to a functional kitchen. Follow these stages in order for the best results. Each phase builds on the last, so you do not get overwhelmed.
Step 1: Empty and Clean
Start by removing every item from one cupboard at a time. Yes, one cupboard. This keeps the task manageable. Wipe down all shelves, backsplashes, and corners. You want a clean surface for your new system. While you clean, check for any expired food or broken items. Toss those immediately. This initial clean sets the tone for the entire project.
Step 2: Sort and Categorize
Create three piles on your counter or table: keep, donate, and toss. Be honest about what you use. Plates that chip, mugs with stains, and gadgets you forgot you own belong in the donate or toss pile. For the keep pile, group similar items together. All baking supplies go in one group. All breakfast items in another. This categorization is the foundation of good cupboard storage solutions.
Quick Tip: Use a timer. Work for just 15 minutes on one cupboard. Short bursts prevent burnout and keep you focused.
Common Mistake: Do not keep items just because they were expensive or gifts. Your cupboard should serve your current life, not your past spending.
Step 3: Measure Your Space
Grab a tape measure and note the height, width, and depth of each shelf. Write these numbers down. They will guide you when you choose organizers or containers. You do not want to buy a shelf riser that does not fit. Accurate measurements are the secret to a cupboard makeover that actually works.
Step 4: Assign Zones
Think of your kitchen as having zones. The zone near the stove holds cooking essentials. The zone near the sink holds dishes and glassware. The pantry zone holds dry goods and snacks. Assign items to the zone where they are used most. This logical placement makes cooking smoother and reduces the number of trips you take across the room.
Expert Insight: Place heavy items like pots and pans on lower shelves. Light items like cereals and snacks go on higher shelves. This respects ergonomics and safety.
Smart Storage Solutions for Cupboards
Once your cupboards are empty and clean, you can add storage tools that fit your space. The right organizers make a huge difference. They turn wasted gaps into usable areas. You do not need to spend a fortune on fancy products. Simple solutions often work best.
Shelf Risers and Tiered Trays
Shelf risers are one of the best investments for maximizing cupboard space. They create a second level on a single shelf. You can stack plates, bowls, or mugs on the lower level and place cups or small jars on the upper level. Tiered trays work the same way for spices or canned goods. You see everything at a glance instead of digging through a stack.
Quick Tip: Use clear risers for items you use daily. They keep the look light and airy. Use wooden or metal risers for a more traditional feel.
Pull-Out Baskets and Lazy Susans
Deep cupboards often hide items in the back. You forget about them and they go to waste. Pull-out baskets solve this problem completely. They slide out like drawers so you can see and reach every item. A lazy Susan works wonders in corner cabinets or deep shelves. You simply spin the unit to access items at the back. These tools are game-changers for kitchen efficiency.
Common Mistake: Do not buy pull-out baskets that are too wide for your cupboard. Measure the opening first. A basket that sticks out defeats the purpose.
Vertical Dividers and File Organizers
For baking sheets, cutting boards, and lids, vertical dividers are essential. They keep these flat items standing upright instead of piling on top of each other. You can use a simple file organizer on a shelf to hold lids. Vertical dividers take up almost no extra space but save you from digging through stacks. This is a key part of any organizing kitchen cabinets plan.
Quick Tip: Repurpose old magazine holders as vertical dividers. They work perfectly and cost nothing.
Organizing by Zone and Frequency of Use
Not all items are used the same way. Your kitchen storage ideas should reflect how you actually live. Some items you reach for every day. Others are used only once a season. Organizing by frequency ensures that your most-used items are always easy to find.
Daily Essentials vs. Rarely Used Items
Place your daily essentials in the most accessible cupboard. These are the plates, glasses, and everyday cookware you use for breakfast and dinner. Keep them at eye level or between waist and shoulder height. Rarely used items like holiday platters or specialty bakeware should go on high shelves or in low, hard-to-reach spots. This separation keeps your everyday zone clear and uncluttered.
Expert Insight: If you have children, keep their everyday dishes in a low cupboard they can reach. This teaches independence and reduces your workload.
Pantry and Dry Goods Organization
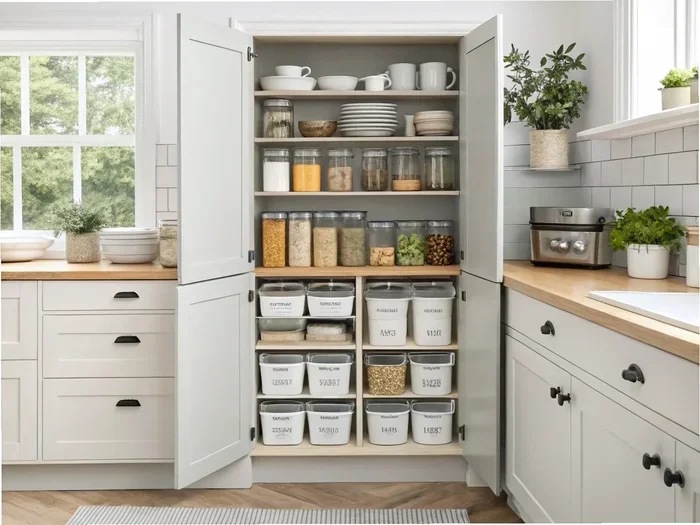
The pantry is often the heart of kitchen cupboard organization. Dry goods like pasta, rice, and cereal can create a mess if not contained. Use clear, airtight containers to store these items. Label each container with the name and date opened. This makes it easy to see when you are running low and keeps pests away. Group items by category: baking supplies together, breakfast items together, snacks together. A well-organized pantry turns cooking into a pleasure instead of a chore.
Quick Tip: Place a small basket under the shelf for loose items like twist ties and rubber bands. It keeps them contained but accessible.
Budget-Friendly Cupboard Makeover Ideas
You do not need a big budget to organize your cupboards. Many of the best solutions come from items you already own or can find for very little money. A cupboard makeover can be both cheap and effective.
DIY Organizers from Household Items
Look around your home before you buy anything. Shoeboxes make excellent drawer and shelf dividers. Wrap them in pretty paper or fabric to match your kitchen style. Mason jars can hold utensils, spices, or small snacks. Tension rods inside a cupboard create instant dividers for spray bottles or cleaning supplies. These space-saving tips cost almost nothing and work surprisingly well.
Common Mistake: Do not use containers that are much smaller than the shelf. Tiny boxes create more clutter, not less. Choose containers that fit the shelf width snugly.
Affordable Products Worth Buying
When you do buy organizers, choose simple and sturdy options. A set of adjustable shelf risers is a worthwhile investment. Pull-out baskets with smooth glides make a big difference. Over-the-door organizers can add hidden storage on the inside of a cupboard door. Spend your money on items that solve a specific problem rather than random gadgets that fill up space. Focus on kitchen tidy solutions that last.
Quick Tip: Check dollar stores and discount retailers for basic bins and baskets. You can often find the same products for a fraction of the price.
Maintaining an Organized Kitchen
Organization is not a one-time event. It is a habit you build over time. Without maintenance, your beautiful cupboard system will slowly fall apart. The good news is that keeping things tidy takes very little effort once you have a good system in place.
The 10-Minute Reset Habit
After each meal, spend 10 minutes putting things back in their place. Wash dishes and load the dishwasher. Wipe down counters and return items to their zones. This daily habit prevents clutter from building up. It also means you start each new day with a fresh, calm kitchen. A kitchen tidy routine keeps your cupboard organizers working properly and your stress levels low.
Expert Insight: Make the reset part of your cooking routine. Do it right after you finish eating, not before bed when you are tired. The timing matters.
Seasonal Cupboard Check-Ups
Once a season, go through your cupboards with a fresh eye. Check for expired food, broken items, or things you no longer need. Rotate seasonal cookware so that holiday items are accessible when you need them. This seasonal review keeps your system accurate and relevant. It also gives you a chance to adjust your organizing kitchen cabinets strategy as your needs change. A 30-minute check-up can save you hours of frustration later.
Common Mistake: Do not wait until a cupboard is completely overflowing to reorganize. Small, regular check-ups keep the system running smoothly.
Conclusion
Learning how to organize kitchen cupboards is one of the most rewarding home projects you can tackle. You do not need perfect systems or expensive products. You just need a clear plan, a little time, and the willingness to start. Follow the steps in this guide: declutter first, measure your space, add smart storage solutions, organize by zone, and maintain your system with small daily habits. Your kitchen will become a place you love to spend time in. Start today, and enjoy the calm that comes with a well-organized home.
Frequently Asked Questions
What is the best way to start organizing kitchen cupboards?
Start by emptying one cupboard completely. Remove everything, clean the shelves, and sort items into keep, donate, and toss piles. This gives you a blank slate to build a smart storage system.
How do I maximize space in small kitchen cupboards?
Use vertical space with shelf risers and tiered trays. Add pull-out baskets or lazy Susans to eliminate dead zones. Store items in clear, uniform containers so you can see everything at a glance.
What are cheap DIY cupboard organizers?
Repurpose shoeboxes as shelf dividers, use mason jars for utensils or spices, and install tension rods to hold spray bottles. These solutions cost almost nothing and work very well.
How often should I reorganize my kitchen cupboards?
Do a full declutter once or twice a year. Maintain order with a 10-minute reset after each meal. Seasonal check-ups help you adjust your system as your needs change.
Where should I store daily dishes in my kitchen?
Keep daily plates, glasses, and bowls in the cupboard closest to your dining area or dishwasher. Place them at eye or waist level for easy access. Store rarely used items on high or low shelves.
Can organizing kitchen cupboards really save time?
Yes, absolutely. When everything has a designated spot, you spend less time searching for items. You cook faster, waste less food, and feel more relaxed in a tidy kitchen.